Frequently Asked Questions
Whether you're setting up your system for the first time or looking for a quick answer in the field, we've got you covered.
Can't find what you're looking for? Our support team is just a call or click away and is happy to help.
Sonetics wireless headsets enable natural conversation in challenging environments; no yelling required. DECT7® wireless technology offers more audio bandwidth, which means the headsets sound great. We combined our industry-leading audio quality with our exclusive auto-leveling, noise cancelling microphone so that you can understand the subtle differences in what you hear even in the middle of a loud work zone.
Sonetics wireless headsets connect to each other through a Base Station or ComHub using DECT7® wireless technology. DECT7 technology enables you to talk to team members without pushing buttons or waiting your turn.
It’s like being on a conference call. Everyone hears each other whenever someone speaks. You can talk when you want to, interrupt when you need to, and warn when you have to.
Learn more about DECT7 wireless technology.
Up to 1,600 feet with an unbroken line of sight to the ComHub. Hang the ComHub in the middle of your work zone, and you’ve got a secure, portable communication ‘bubble’ that you can pick up and move wherever the work takes you. Your actual range may vary due to work site conditions. Learn how to maximize system range
Connect up to 20 team members on a portable system. Installed systems (in a vehicle or building) can connect even larger teams. Contact your Sonetics representative for more information on large systems.
To get started, you will need a Sonetics System, which includes wireless headsets, a ComHub or Base Station to connect them. For a portable system, we also have cases to store, charge, and protect your equipment.
For more details, visit our Solutions page or contact us.
Sonetics has a one year warranty.
Sonetics Stereo Listen-Through Technology lets you mix in environmental sound so you can monitor equipment, hear warnings or keep an ear on traffic, all without removing your hearing protection or losing contact with your team.
Absolutely. The headband’s fit is adjustable and also reconfigurable into “under-helmet” wear that puts a soft strap over your head and rotates the hard headband behind your neck. It works for most hard hats and ball caps.
We also offer hard hat adapters that mount each ear dome to a heavy-duty adjustable clip that fits the attachment points of most standard and specialty hard hats.
You can connect virtually any make/model of portable two-way radio. Find supported radios.
Sonetics wireless headsets are built to handle rugged working conditions like rain, snow, mud and dust. They’re IP66-rated, dustproof, water-resistant, and operate between -20°F and 140°F.
You can select from up to five channels available on the Base Station and switch between them with a button on the headset. The factory default is a single channel. To add more, switch your Base Station to Channel Mode by watching this quick video:
Yes, accessories like replacement batteries, ear seals, mic muffs (for wind noise reduction), ear dome ruggedizers (for updated headset colors), and more are available from the Sonetics Shop or your Authorized Sonetics Reseller.
A sound level meter is used to measure sound pressure levels in decibels (dB). The device is often tripod-mounted and used in a fixed location.
Measuring sound levels for the purpose of determining occupational noise exposure must take into account a “time-weighted average noise level of 85 dBA or higher over an 8-hour work shift.”
Consult your safety manager or an environmental safety and health professional for assistance with compliance and noise exposure mitigation. Resources are available from OSHA and industry groups.
Three factors combine to determine whether you’re at risk for hearing damage from noise exposure: sound level, time and distance. Sounds above 85 decibels are risky and sounds above 125 decibels will cause immediate hearing damage.
The risks increase with the amount of time you’re exposed to loud noise, and how close you are to the source of that noise. The louder it is, the longer you’re exposed and the closer you are to it, the more you’re at risk for hearing damage.
It’s like being on a conference call. Everyone hears each other whenever someone speaks. You can talk when you want to, interrupt when you need to, and warn when you have to.
Learn more about DECT7 wireless technology.
-
Remove the Headsets, ComHub, and any accessories from the Pelican charging case.
-
Plug the Headsets and ComHub into the charging cables inside the case.
a. Follow the cut-outs to position the headsets within the case.
b. Place the ComHub in its foam cutout. -
Secure the case lid.
-
Insert the power supply’s barrel jack into the Charging plug on the side of the Pelican case. Hand-tighten the jack’s retention nut to prevent accidental removal.
-
Plug the wall adapter into a standard 120v power outlet.
-
Allow up to 4 hours to completely recharge all batteries.
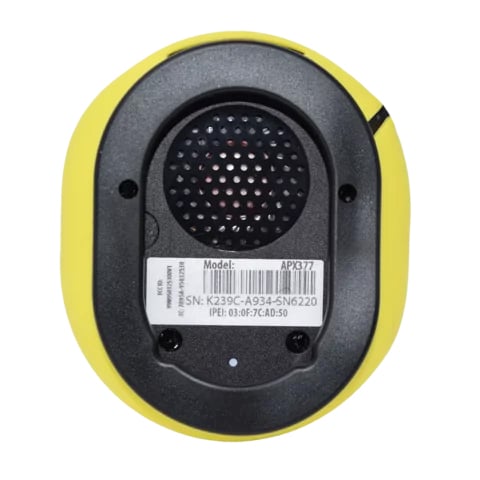
A sticker on the inside of the right ear dome displays your headset’s model and serial number. To see it, remove the ear seal and inner foam cover from the right ear dome (the one without the microphone boom).
Sonetics wireless headsets enable natural conversation in challenging environments; no yelling required. DECT7® wireless technology offers more audio bandwidth, which means the headsets sound great. We combined our industry-leading audio quality with our exclusive auto-leveling, noise cancelling microphone so that you can understand the subtle differences in what you hear even in the middle of a loud work zone.
For a review of the headset’s button layout and basic operation, watch our Basic Features video.
Microphones on the forward edge of each ear dome can be turned on to allow the user to hear environmental sound. Use Sonetics Listen-Through technology when you need to remain aware of hazards, monitor equipment or speak to someone outside your team without the need to remove your headset.
The maximum sound level that Sonetics Listen-Through technology will let you hear is 95 decibels. If a sound should exceed that (a gunshot or explosion, for example), the headset will instantly shut down the ear dome speakers, protecting you from the sudden noise. You’ll hear a few moments of silence, followed by a gradual return to your previous settings.
The headset will respond to many button presses, menu selections and other status changes with voice prompts. For example, when you turn on the headset, you’ll hear “Sonetics on. Battery high. Base Station connected.”
For our complete illustrated fitment guide, refer to the User Manual. Here are a few key steps to remember when putting on your headset:
1. Inspect the ear seals (the pads that rest against your head) for damage before use.
2. While wearing, make sure that the ear seals rest against your skull without sitting on any part of your ear.
3. The microphone should be no more than 1/8″ from your mouth.
4. Adjust the headband or soft strap for a comfortable, gentle fit across the crown of your head.
It’s normal to feel a bit of pressure when you wear the headset properly. The seal protects you from dangerous noise levels.
A status LED on the left ear dome will flash from 1 to 4 times when the headset is powered on. Four flashes indicates a full charge. A single flash means it’s time to recharge the headset.
Use the provided 12VDC regulated wall adapter or one of the headset charging cables in your Sonetics Charging Case. For details on vehicle charging, refer to the User Manual.
Absolutely. The headband’s fit is adjustable and also reconfigurable into “under-helmet” wear that puts a soft strap over your head and rotates the hard headband behind your neck. It works for most hard hats and ball caps.
We also offer hard hat adapters that mount each ear dome to a heavy-duty adjustable clip that fits the attachment points of most standard and specialty hard hats.
You can connect virtually any make/model of portable two-way radio. Find supported radios and cables.
Sonetics wireless headsets are built to handle rugged working conditions like rain, snow, mud and dust. They’re IP66-rated, dustproof, water-resistant, and operate between -20°F and 140°F.
If you notice background noise coming through the microphone or you’re having trouble hearing yourself, it’s time to adjust the mic’s sensitivity setting for a better experience.
Press the POWER button.
-
Press the PLUS button on the left dome and the FWD button on the right ear dome at the same time, then let go. A voice prompt will announce the current mic setting.
-
Adjust the mic sensitivity to any of the eight available settings by using the PLUS and MINUS buttons on the left dome.
For a mix of high- and low-noise environments, the factory setting of Mic Auto 1 is recommended.
-
After selecting a setting, exit the menu by pressing the PUSH-TO-TALK button on the right ear dome.
-
Test out the setting with team members by putting the headsets on and talking into the microphone.
-
Repeat steps 2-5 if adjustments are needed to find the best setting for your environment.
A walkthrough of the basic features on Sonetics’ third-generation wireless headsets. Includes volume control, listen-through, channels, power and other daily-use features.
Right ear dome features
-
The POWER button is located on the upper right.
-
The FWD and BACK buttons control Listen-Through volume and DECT channel selection.
-
The PUSH-TO-TALK button is located between the FWD and BACK buttons.
-
The DC charge port is located beneath the PUSH-TO-TALK button.
-
The battery access door is located on the back of the dome beneath the right ruggedizer.
Front of headsets
- Stereo Listen-Through microphones are located on the front of each ear dome.
- The boom mic connects to the left ear dome (except APX372). The “TALK” label should face your mouth.
Left ear dome features
-
The PLUS and MINUS buttons control intercom volume, and Advanced Menu navigation and selection.
-
The PUSH-TO-TALK button is located between the PLUS and MINUS buttons.
-
The Status LED shows whether the headset is powered on, if you are connected to DECT and/or Bluetooth, and the current battery level (Low = 1 flash; High = 4 flashes).
-
The portable radio wired connection access door is located on the back of the dome beneath the left ruggedizer.
-
Mini USB port – Remove the left ear seal and inner foam to find a flap covering the mini USB port. The port allows a Windows PC connection to update and configure the headset
How to connect to your preferred power source and charge your Sonetics wireless headset.
Plug the A/C or D/C charger into the charge port on the bottom of the right dome.
- The status LED will glow red while it is charging.
- Once the headset is fully charged, the status LED will glow green.
-
Listen-Through volume buttons are located on the right ear dome (without the mic boom).
-
Press the FWD button to increase Listen-Through volume.
-
Press the BACK button to decrease Listen-Through volume.
-
Press and hold the BACK button to toggle Listen-Through volume off.
-
Press and hold the FWD button to return to your most recent Listen-Through volume setting.
-
Following each adjustment, a voice prompt will announce the new volume setting.
-
There are five (5) Listen-Through volume settings.
-
Main Volume buttons are located on the left ear dome (with the mic boom).
-
To increase volume, press the button on the left ear dome.
-
To decrease volume, press the button on the left ear dome.
-
To quickly increase volume to maximum, press and hold the button until you hear a voice prompt announce “volume maximum.”
-
To quickly decrease volume to minimum, press and hold the button until you hear a voice prompt announce “volume minimum.”
-
Following each adjustment, a voice prompt will announce the new volume setting.
-
There are six (6) Main Volume settings.
-
Turn the headset off.
-
Simultaneously press and hold the FWD and BACK buttons on the right ear dome (without the mic boom). Continue to hold during Step 3.
-
Press and hold the Power button on the right ear dome.
-
When you hear a voice prompt announce “Sonetics on. Battery (level). Advanced Menu,” release all three buttons.
For instructions on making adjustments to Advanced Menu settings, click here.
To first access the Advanced Menu, follow these instructions.
-
Press the Menu button on the left ear dome to cycle through different settings.
a. To adjust an individual setting, cycle through the options using the and buttons.
b. To select a different Advanced Menu setting, continue pressing the Menu button. -
To Save and Exit the Advanced Menu, press the Push-to-Talk button on the right ear dome.
To create a new Bluetooth pairing:
1. Turn off the headset, then turn it back on.
2. The headset will enter Bluetooth pairing mode for 10 minutes after power on.
3. From your device’s Bluetooth connectivity options, search for new devices.
4. Once the search is complete, select “Sonetics-HS##.” If prompted for a password, enter four zeros (0000).
To answer a Bluetooth call, press and release the Menu button.
To end a Bluetooth call, press and release the Menu button.
How to quickly modify your Sonetics wireless headset to accept a direct-wire portable radio or other direct-wire device.
When connecting your direct wire radio or device to your Sonetics APX 3-Series Headsets, you will need the following:
- Portable Radio
- Portable Radio Adapter Cable
- Sonetics Screwdriver
- Scissors
Instructions:
-
Place the handle of the Sonetics Screwdriver between the rigid headband and left ear dome. Use your other hand to press down on the headband until it pops off the dome.
-
Peel back the ruggedizer, slide it off the boom mic, and set the headset aside.
-
On the inside of the ruggedizer is a molded outline for the direct wire door. Fold the ruggedizer so the outline is folded in half and the lines match up with each other.
-
Snip along the folded lines with the tip of the scissors to make an access point with the scissors.
-
Unfold the ruggedizer and starting at the snipped section, cut along the molded outline until the section can be removed and discarded.
-
Put the ruggedizer back on the dome by placing the lower hole through the boom mic and sliding the ruggedizer into place on the dome. Check that the new cutout on the backside is over the direct wire door.
-
Align the headband to the center of the dome and snap in place.
-
Take the Sonetics screwdriver to pry the direct wire door open.
-
Take the adapter cable and plug it inside the wire door opening and use the screwdriver to tighten the screw and secure the plug in place. Secure tightly to keep the connector waterproof.
-
Connect the other end of the adapter into the radio.
-
Refer to your manual or check with your dealer as you may need to make some programming adjustments to your radio.
-
Set the volume on your radio, then set your radio transmit, and you’re ready to go!
-
Expand the headband to full width.
-
Place the ear domes over your ears, the headband over the crown of your head, and position the microphone boom over your left cheek.
-
Position the microphone no more than 1/8 inch from your lips. The “TALK” label should face your mouth.
-
Ensure the padded ear seals completely cover your ears with all parts of the ear seals resting against your skull, not your ears.
-
Adjust the hard headband to sit gently on top of your head.
-
Test the ear seals by pressing against your head and listening for a change in sound level.
-
Expand the hard headband to full width.
-
Place the ear domes over your ears, the Velcro head strap over the crown of your head, the hard headband behind your neck, and the microphone boom over your left cheek.
-
Position the microphone no more than 1/8 inch from your lips. The “TALK” label should face your mouth.
-
Ensure the padded ear seals completely cover your ears with all parts of the ear seals resting against your skull, not your ears.
-
Adjust the Velcro head strap to sit gently on top of your head:
a. Pull the tabs to release the Velcro.
b. Adjust the length of the head strap for comfort.
c. Press the tabs to seal the Velcro. -
Adjust the hard headband to fit comfortably behind your neck.
-
Test the ear seals by pressing against your head and listening for a change in sound level.
Update firmware and configure settings on your Sonetics wireless headsets. This includes enabling, adjusting and disabling features like listen-through awareness and microphone sensitivity.
Update Firmware
-
Locate the USB-to-Mini USB cable included with your headset.
-
Take off the inner ear seal from the left dome of the Sonetics headset.
-
Remove the foam cover from the inside of the dome.
-
Lift up the rubber door inside the dome to access the mini USB connector.
-
Plug in your USB.
-
Turn on your device.
-
Headsets: Hold down POWER button near the top of the right ear dome for half a second.
-
Base stations: Will turn on automatically once you plug in the USB.
-
-
Click on the “Find Device” button in the bottom left of the Sonetics Configuration Utility software menu.
-
Proceed with any Firmware updates, if available, by selecting the yellow “Update Firmware” button and following the prompts.
Note: If your Firmware is out of date, there will be a red box next to the Application field.
-
The update is complete once the green bar is full and the Programming Status shows “You may remove device”.
Note: The red box in the Application field should be gone.
-
Select the “Customize Device” button on the left side of the Configuration Utility menu.
-
Refer to your manual regarding the features listed and select your preferred settings.
-
Once you have selected your preferences, click on the yellow “Write Menus” button to save the selections.
Saving Cloned Settings to A New Device
-
To clone the settings to save for other devices, go to the “File” dropdown and select “Save Menu File As” and save the file to your computer.
-
When you plug in another headset, you can go to the “File” dropdown and select “Load Menu File” and find the cloned settings file that you saved to your computer.
-
Click on the yellow “Write Menus” button to write the cloned settings to the new device.
Return to Factory Settings
-
Open up the Sonetics Configuration Utility software.
-
Select the “Customize Device” button on the left side of the Configuration Utility menu.
-
Click on the “Menu Defaults” button on the right side of the window.
-
Click on the yellow “Write Menus” button to save the selections.
Viewing Settings on a Device
-
Open up the Sonetics Configuration Utility software.
-
Select the “Customize Device” button on the left side of the Configuration Utility menu.
-
Click on the blue “Read Menus” button and the settings will display below.
For additional help, go to the “Help” tab. The Software Manual can be downloaded there or the Product Manual for the specific device that is connected.
Just a few quick steps let you easily reconfigure the headband on a Sonetics wireless headset from behind-the-head (or hard-hat compatible) to over-the-head wear.
-
To reconfigure the headband from behind-the-head to over-the-head wear, begin by removing the Velcro head strap from the ear domes. Set aside.
-
Place the handle of the Sonetics Screwdriver between the rigid headband and ear dome. Use your other hand to press down on the headband until it pops off the dome.
-
Repeat Step 2 to detach the headband from the other dome.
-
Move the headband 90 degrees forward and press it firmly back into the ear dome.
-
Repeat Step 4 to reattach the headband to the other ear dome.
-
To reconfigure from over-the-head to behind-the-head wear, reverse Steps 1-5.
Here’s how to pair Sonetics wireless headsets with a Comhub or base station.
-
Power on the Base Station and connect the DC power adapter.
Wait until the green power light is illuminated. -
Hold down the pairing button on the base station for the position you want to pair.
The yellow LED will start flashing slowly. -
On the Wireless Headset, hold down the right PUSH-TO-TALK and POWER buttons.
A voice prompt announces “Base Station registering”, and the status LED on the left ear dome will flash green and red. -
Release both buttons.
-
Check the Base Station to confirm the headset is successfully paired.
The yellow LED pairing light on the base station will stop flashing and remain yellow indicating that the headset is paired.
Follow these steps to remove and replace the headband and ruggedizers on a Sonetics Wireless Headset. The headset color can be changed to help identify individual users or team roles. Visit the Sonetics Store for new headset colors (ruggedizers) and other replacement parts.
What You Will Need
- Replacement Sonetics headband
- Pair of silicone ruggedizers
- Sonetics screwdriver
Steps
-
REMOVE the soft head strap by unhooking the Velcro tabs on each end and pulling the strap out of the slots on top of the ear domes. Set the strap aside.
Note: You can SKIP THIS STEP if your headset is in over-the-head configuration.
-
POSITION the handle of the Sonetics Screwdriver between the plastic headband and ear dome. While holding the screwdriver in place, use your other hand to press down on the headband until it pops off the dome. REPEAT Step 2 on the other side of the headband.
Note: There is a RIDGE on the underside of the headband that will help align the Sonetics Screwdriver
-
Remove the CROSSOVER CABLE from the headband. PULL GENTLY in the direction that each clip opens to release the cable and SET ASIDE the old headband.
Note: There are 4 CLIPS holding the cable in place. The two outside clips open toward the top of the headband, while the two inside clips open downward.
-
REMOVE THE RUGGEDIZERS by peeling them off the ear domes.SLIDE the left ruggedizer down the mic boom and off, and set both ruggedizers aside.
-
IDENTIFY the Left Ruggedizer of your replacement pair, which has an extra opening for the mic boom.INSTALL the Left Ruggedizer by INSERTING the mic boom through the lower opening. SLIDE the ruggedizer back up over the mic boom. FIT the ruggedizer onto the ear dome and check the fit over the Listen-Through microphone. INSPECT for gaps and curling around the ear seal.
-
REPLACE the Right Ruggedizer by fitting onto the ear dome.CHECK the fit over the Listen-Through mic and power adapter and INSPECT for gaps and curling around the ear seal.
-
REINSTALL the plastic headband with the crossover cable clips pointed down.LAY the right ear dome down flat, while holding the LEFT EAR DOME in your left hand. LINE UP the cross on the headband with the socket on the ear dome and push together firmly to reconnect. Repeat for the right ear dome.
-
REINSTALL the crossover cable underneath the black plastic headband by gently PRYING UP each clip to fit the cable underneath. ROUTE the cable underneath all four clips on the headband.
-
REINSTALL the Velcro soft strap by SLIDING the strap through the slot on top of each ear dome. FOLD the ends over and press to secure the Velcro.
Note: SKIP THIS STEP if your headset is in over-the-head configuration.
-
Press and release the Power button on the right ear dome (without the mic boom).
-
A voice prompt will announce “Sonetics off.”
-
The LED on the left ear dome will turn off.
-
Press and release the Power button on the right ear dome (without the mic boom).
-
A voice prompt will announce “Sonetics on. Battery (level).”
-
The LED on the left ear dome will begin flashing.
It’s the component in a Sonetics Wireless Communication System that connects wireless headsets together. The SON150 Base Station can connect up to five wireless headsets.
The ComHub stores the wireless base station in a portable, battery-operated, weatherproof case. As such, you can pick up the ComHub and carry it around the work zone with you. You also use the ComHub to connect a two-way radio.
You can expect up to 24 hours of battery life from the SCH305 ComHub, and up to 12 hours from the SCH310 and SCH310T ComHubs.
A status LED next to the power button flashes from 1 to 4 times when the ComHub is powered on. Four flashes indicates a full charge. A single flash means it’s time to charge the ComHub.
Use the provided 12VDC regulated wall adapter or the ComHub charging cable in your Sonetics Charging Case.
Make sure you position the ComHub upright (there are stickers on the case to help you orient it). Raise it up off the ground as much as is safe, and try to have as few obstacles between the ComHub and the headsets as possible (clear line of sight).
You can connect virtually any make/model of portable two-way radio.
Watch this quick video on how to connect a portable two-way radio to the ComHub, or review the full instructions in your ComHub user manual.
You can select up to five channels available on the Base Station and switch between them with a button on the headset. The factory default is a single channel.
For tethering to work with a SCH305-BT, the ComHub needs to be set up into Channel Mode: Set up for 2 Channels. This is not needed when you are only using the SCH305 ComHub version. Reason for this, is the addition of the Bluetooth module in the SCH305-BT. You can tether with the SCH305-BT ComHub, but you cannot access the device which is Bluetooth paired to the SCH305-BT from the same channel as the tethered group. The tethered group will be on Channel 2 and the Bluetooth paired device is on Channel 1.
Yes. Broadcast mode functions the same way as with the SCH305 ComHub.
Yes. Channel Mode is supported on the SCH305-BT.
Currently, the SCH305-BT does not support two-way radio transmit and receive functions.
A few things you can try are the following:
1. Turn off all Bluetooth enabled devices around you.
2. Power cycle the SCH305-BT.
3. If you have multiple SCH305-BT ComHub's, make sure you have one powered ON at a time.
Your device needs to be a cell phone, tablet, or laptop. If you are trying to pair a different device it may not pair to the SCH305-BT.
Here's how to pair Sonetics wireless headsets with a Sonetics Comhub / Base Station .
-
Power on the Base Station and connect the DC power adapter.
Wait until the green power light is illuminated.
-
Hold down the pairing button on the base station for the position you want to pair.
The yellow LED will start flashing slowly.
-
On the Wireless Headset, hold down the right PUSH-TO-TALK [icon-button-ptt-right] and POWER [icon-button-power] buttons.
A voice prompt announces “Base Station registering”, and the status LED on the left ear dome will flash green and red.
-
Release both buttons.
-
Check the Base Station to confirm the headset is successfully paired.
The yellow LED pairing light on the base station will stop flashing and remain yellow, indicating that the headset is paired.
TIP: If you’re using a Comhub, open the ComHub red bag, remove the black case and open its lid to access the Base Station before beginning the pairing procedure.
-
Unsnap the cover of the red bag and remove the ComHub.
-
Take your PR cable and connect to the Intercom Port on the Control Panel.
-
Use the Sonetics screwdriver to tighten the screw.
-
Take your ComHub and slide it back in the bag with the PR cable coming out the top.
-
Snap the cover of the bag in place.
-
Connect the far end of the PR cable to your portable radio.
Short video demonstrating how to connect a portable two-way radio to the ComHub using a Portable Radio Adapter.
Here’s how to clear a wireless headset pairing on your Sonetics SON150 DECT7 Wireless Base Station.
-
Hold down the pairing button that is in quick flash mode, and the LED light will change to slow flash mode.
-
Disconnect the power cord from the base station.
-
Reconnect the power cord, and the green POWER LED light will illuminate, but LED light above the pairing button should not be lit up anymore.
This indicates that the pairing is cleared.
Here’s how to clear a wireless headset pairing on your Sonetics DECT7 Wireless ComHub.
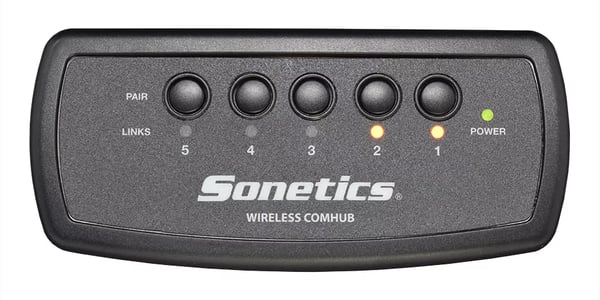
- Access the ComHub’s Base Station:
a. Remove the gray Pelican case from the red nylon bag.
b. Open the latches and lift the case lid. - Turn on the ComHub by pressing the Power button on the control panel.
- Hold down the pairing button that is in quick flash mode and the LED light will change to slow flash mode.
- Press the Power button on the Base Station control panel to turn off the ComHub.
- Press Power to turn on the ComHub. The green POWER LED light will illuminate, but the LED light above the pairing button will turn off.This indicates that the pairing is cleared.
Here’s a quick look at how to configure your Sonetics DECT7 Wireless Base Station for each of its three operating modes.
Digital Intercom Connection:
-
Disconnect the base station from the power supply.
-
Hold down pairing buttons 1 and 2 while connecting the power supply.
Wait until only the yellow LED lights above pairing buttons 1 and 2 light up as well as the green POWER LED light. The green LED lights on the ports 1 and 2 will also light up.
-
Unplug the base station and plug it back in.
Legacy Analog Intercom:
-
Disconnect the base station from the power supply.
-
Hold down pairing buttons 2 and 3 while connecting the power supply.
Wait until only the yellow LED lights above pairing buttons 2 and 3 light up as well as the green POWER LED light. The green LED lights on the ports 2 and 3 will also light up.
-
Unplug the base station and plug it back in.
Base Station Portable ComHub Connection:
-
Disconnect the base station from the power supply.
-
Hold down the pairing button 3 while connecting the power supply.
Wait until only the yellow LED light above the pairing button 5 lights up as well as the green POWER LED light.
-
Select the pairing button that matches the number of channels you need. The yellow LED light will come on above it.
-
Unplug the base station and plug it back in.
-
Repeat steps 1 – 4 to when needing to readjust the number of channels.
Most teams that communicate with Sonetics wireless headsets rarely need the system’s full range. When team members are within a few hundred feet of a ComHub on a Vactor or tow truck, crane, construction job site or factory floor, DECT7 connectivity is strong and dependable.
But some teams need every inch of the 1,600-foot range that DECT7 provides from a ComHub. Road construction crews, agricultural workers and marine operations often include team members who need to work at the edge of DECT7’s range, where they can still take advantage of interference-free, secure communication that’s as clear and seamless as a landline conference call.
Remember these three phrases when you want to extend the range of your Sonetics wireless team communication system:
- Line-of-sight
- Height
- Orientation
Essential Components of Maximum Range
No card tricks here. Antennas define the coverage area of DECT7 wireless. Our dual-dome antenna design in the headsets uses diversity switching to lock in the best of the two signals. In other words, users don’t need to worry about head position relative to the ComHub. No matter which way you turn, DECT7 delivers the best possible connection at all times.
Speaking of the ComHub, it’s the central nervous system of your work site’s wireless communication setup. As long as you have a charged ComHub and headsets, you have
a secure, local communication network no matter how remote your jobsite. There are no external antennas that break, snag or need to be replaced. Everything is contained in a weatherproof portable case. Official specifications for the range of DECT7 wireless from a ComHub is 1,600 feet line of sight. Where you position your ComHub factors greatly into achieving that maximum range.
Outta Sight, Outta Touch?
The first guiding principle to help you maximize range, “line-of-sight,” doesn’t necessarily mean that you have to be able to see the ComHub from just over five football fields away. This is not an eye test. But as long as there are no barriers between you and the ComHub, you can expect uninterrupted communication at up to 1,600 feet.
Barriers can reduce the system’s range as your signal uses some of its power to climb over and around structures and equipment. So if the ComHub is blocked from your line of sight by a lot of big, heavy equipment, walls or mountains, then you will have to use trial and error to determine the best placement. To help you position the ComHub, the headsets include an out-of-range voice prompt if the connection weakens and is about to be lost.

Range testing the Sonetics ComHub.
The Height of Elevation
Getting the ComHub off the ground is actually an extension of the line-of-sight guiding principle. You’ll have a better chance of seeing the ComHub from five football fields away if you raise it up in the air. Usually, the range will be greater if the ComHub is four to 16 feet off of the ground. This is also the best way to avoid ground-level obstructions such as automobiles, boulders, or small trees. The ComHub is housed in a sturdy, weatherproof nylon bag with a coated hook attachment, so it’s easy to securely hang off of a ladder or aerial lift.
Stand Up for Orientation
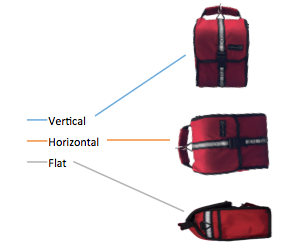
Orientation matters: Vertical and horizontal orientations deliver the most consistent results.
How you orient the ComHub also matters. Of the three standard options for orientation—vertical, horizontal or flat—vertical and horizontal both help you maximize the system’s range.
Beyond 1,600 feet
For all team members to take advantage of full-duplex or broadcast connections in crystal-clear DECT7, they need to be within range of the ComHub. It is possible in some circumstances to extend range beyond 1,600 feet (for example, we got 4,400 feet of range using the idealized setup shown in the photo above). However, you should have backup communications at the ready if you know you’ll be operating at the edge of DECT7 range.
Beyond DECT7 range, the entire world is within reach. You can direct-wire a connection to a two-way radio if you want to extend the range to a few miles. Note that you’ll be subject to the two-way limitations of PTT and half-duplex communication. Bluetooth-enabled systems also allow you to wirelessly connect to your cell phone with your headset, giving you global communication options.
-
Press and briefly hold (1-2 sec.) the Power button on the ComHub’s control panel.
-
The green Status LED next to the Power button will illuminate and then begin flashing to indicate battery level.
-
Press the Power button on the ComHub’s control panel.
-
The green Status LED next to the Power button will turn off.
-
Connect the included 12VDC wall adapter’s barrel jack to the Charger Port on the ComHub’s control panel.
-
Plug the wall adapter into a standard 120V wall outlet.
-
The Charge LED in the center of the Power button will light solid red.
-
Allow up to 4 hours to completely recharge a depleted battery.
-
Ensure you have purchased the correct Portable Radio (PR) Cable for your radio’s make and model.
See the Radio Interface Guide for details.
-
Connect the PR cable’s ComHub plug to the Intercom port on the ComHub control panel using the included Sonetics Screwdriver or a flathead screwdriver.
-
Connect the portable radio plug to your radio.
-
Access the ComHub’s Base Station:
a. Remove the gray Pelican case from the red nylon bag.
b. Open the latches and lift the case lid. -
Turn on the ComHub by pressing the Power button on the control panel.
-
Press and hold the desired pairing button until its yellow LED link indicator begins to flash slowly.
-
With the Headset powered off, place the APX377 or APX379 Wireless Headset into pairing mode by pressing the Push-to-Talk button and Power button simultaneously until a voice prompt announces “Sonetics on. Battery (level). Base Station registering.”
-
Immediately release both buttons.
-
The Base Station will automatically connect, showing a solid yellow link LED.
-
A Headset voice prompt will announce “Base Station connected.”
-
If pairing was unsuccessful, repeat Steps 3-5.
-
Using the included 12VDC Wall Adapter, connect the barrel jack to the power port on the SON150. Connect the adapter to a standard 120V wall outlet.
-
Press and hold the desired pairing button until its link indicator begins to flash slowly. Any previous pairing will be cleared.
-
With the Headset powered off, place the APX377 or APX379 Wireless Headset into pairing mode by pressing the Push-to-Talk button and Power button simultaneously until a voice prompt announces “Sonetics on. Battery (level). Base Station registering.”
-
The SON150 will automatically connect, showing a solid pairing button LED.
-
If the pairing was unsuccessful, repeat Steps 1-2.
Installing the Sonetics Configuration Utility software for Windows version 7 and later.
- Complete and submit the Firmware Request form.
You will receive an email from service@sonetics.com with a link to download the latest version of the Sonetics Configuration Utility software.
- Once your download is complete, open the ZIP file and double click on the “setup.exe” file.
- Go through the wizard and install on the C:\ drive and also install the drivers.
- If user account notifications pop up, they are safe to proceed.
- Select “Install Drivers” in the USB Management Tool then close the window and the installation window.
- Open the Sonetics shortcut on the desktop to access the Sonetics Configuration Utility software.
Update firmware and configure settings on your Sonetics DECT7 wireless base station. Enable and disable operating modes.
Updating the Base Station:
- Follow the steps in the Installing the Sonetics Configuration Utility tutorial.
- Open the Sonetics Configuration Utility.
- Plug in the mini USB cable to the base station. The green POWER light should illuminate.
- Click on the “Find Device” button in the bottom left of the Sonetics Configuration Utility software menu.
- Proceed with any Firmware updates, if available, by selecting the yellow “Update Firmware” button and following the prompts.
Note: If your Firmware is out of date, there will be a red box next to the Application field. - Select the “Customize Device” button on the left side of the Configuration Utility menu.
- A pop up will direct you to enter Boot Mode on the base station.
- Unplug your USB, hold down the pairing button 5 and plug the USB cable back in. The green POWER light will start flashing.
- The update is complete once the green bar is full and the Programming Status shows “You may remove device”.
Note: The red box in the Application field should be gone.
Configuring the Base Station:
- With the device still connected, select the “Customize Device” button on the left side of the Configuration Utility menu.
- Refer to your manual regarding the settings and how to adjust the number of channels.
- Once you have selected your preferences, click on the yellow “Write Menus” button to save the selections. The selections have been updated once the green status bar is full.
- Exit the Configuration Utility.
-
Using the included 12VDC Wall Adapter, connect the barrel jack to the power port on the SON150. Connect the wall adapter to a standard 120V outlet.
-
For vehicle power, use the 12V Cigarette Lighter Adapter. Connect the barrel jack to the power port on the SON150. Connect the adapter’s power plug to a 12V vehicle adapter.
Devices you can pair include: cell phones, tablets, and laptops.
-
With the lid of the SCH305-BT open and the SCH305-BT powered ON, you will see a LED light in the lower RIGHT corner of the ComHub which will blink RED and BLUE quickly. This indicates Bluetooth mode is ON.
-
With your user device (cell phone, tablet, or laptop) ON, look for: “SCH305-BT” (this is the SCH305-BT device name). Select the “SCH305-BT” to start pairing.
-
The BLUE LED light in the lower RIGHT corner will blink BLUE when devices are successfully paired.
Bluetooth Pairing Tips:
-
If pairing is unsuccessful, repeat the steps again.
-
If your ComHub has been on for a while and pairing is not successful, simply power cycle your SCH305-BT.
-
When using FaceTime, you must also change the speaker output to “SCH305-BT” on the user device paired to the SCH305-BT.
-
If multiple SCH305-BT ComHubs are close to each other, we recommend having one SCH305-BT ComHub powered ON at a time when doing the Bluetooth pairing. Once the first Bluetooth pairing is complete on the first SCH305-BT, then power ON the next SCH305-BT to pair a Bluetooth device to the second ComHub.
NOTE: Bluetooth in portable two-way radios is not currently supported.
-
See the “DECT Channel Mode Operation” section to put your SCH305-BT into Channel Mode. Follow the “Configuring for Channel Selection” steps.
-
When you are selecting the “Number of Available Channels”, select the “2” pairing button, to select 2 channel mode.
-
To exit this configuration mode, power off the SCH305-BT, then power it on.
Bluetooth Pairing Tips:
-
If pairing is unsuccessful, repeat the steps again.
-
If your ComHub has been on for a while and pairing is not successful, simply power cycle your SCH305-BT.
-
When using FaceTime, you must also change the speaker output to “SCH305-BT” on the user device paired to the SCH305-BT.
-
If multiple SCH305-BT ComHubs are close to each other, we recommend having one SCH305-BT ComHub powered ON at a time when doing the Bluetooth pairing. Once the first Bluetooth pairing is complete on the first SCH305-BT, then power ON the next SCH305-BT to pair a Bluetooth device to the second ComHub.
NOTE: Bluetooth in portable two-way radios is not currently supported.
Hold down the Power button for 15 seconds, then release.
This will restart Apex Connect.
With Bluetooth you can pair headsets, wireless ear buds, headphones, speakers and/or speaker phones. (Hands-free Profile Format Required)
Yes. Apex Connect is watertight and dust proof and IP67 rated.
No. Apex Connect is designed around Bring Your Own Headset. This allows users to interact the way they want.
-
Power on the Base Station/Comhub and connect the DC power adapter.Wait until the green power light is illuminated.
-
Hold down the pairing button on the base station for the position you want to pair.The yellow LED will start flashing slowly.
-
On the Apex Connect, power it ON by pressing and holding the Power button 2 seconds, then release.The Power LED will come on and the DECT LED will blink Green.
-
On the Apex Connect, hold down the Power AND PTT buttons simultaneously for 2 seconds, then release.The DECT LED will change to a slower blinking Green.
-
The DECT LED will turn Solid Green on the Apex Connect when DECT pairing is complete.The yellow LED pairing light on the base station will stop flashing and remain yellow.
-
Turn ON your Bluetooth headset, earbuds, or speaker.
-
On the Apex Connect, power it On by pressing and holding the Power button 2 seconds, then release.The Power LED will come on.
-
Follow your Bluetooth headset, earbuds, or speaker’s instructions to put your device into pairing mode.
-
Put Apex Connect into Bluetooth pairing mode by simultaneously pressing the PTT and + buttons and holding for 2 seconds, then release. The Bluetooth LED on the Apex Connect will be blinking Blue.
-
Bluetooth pairing is successful when the Bluetooth LED is solid blue on Apex Connect.
-
On the side of Apex Connect, use the + and – buttons to increase or decrease the volume.
You will hear an audible voice prompt stating the volume level.
-
With Apex Connect powered ON, press the – button for 2 seconds and release.
-
To turn OFF the Mute feature press the PTT button or press the – button for 2 seconds and release.
The Mic LED will turn off.
The Power LED will turn Green or Red (depending on battery level).
The LED indicators will turn off.
1. Press and briefly hold the power button on the right ear dome.
2. The status LED on the left ear dome should begin flashing.
3. If the Status LED does not flash, connect the headset to the power adapter and allow it to charge. Allow the headset battery to charge for a minimum of 4 hours to allow for up to 24 hours of operational use.
If the headset will not turn on after performing Steps 1-3, contact Support
Is the ComHub or Base Station powered on? Check the ComHub’s status LED (to the right of the power button). It should be flashing green. If not, press the power button.
If you’re using a stand-alone wireless Base Station, connect it to your power source using the supplied 12VDC adapter. The Base Station’s power LED will show a steady green.
Is the headset powered on? Check the headset’s status LED on the left ear dome. If there is no light, press and briefly hold the power button on the right ear dome. The status LED should begin flashing red, and you’ll hear a voice prompt announce “Sonetics on.”
Is the headset paired to its base station? As the headset turns on, a voice prompt will announce “Sonetics on. Battery (high/medium/low).” If you turned on your ComHub prior, the headset will announce “Base station connected” when pairing is complete. If you don’t hear that prompt, check the headset’s status LED. It will flash green if it’s paired to your ComHub or base station. If it’s flashing red, it’s powered on but not paired. Follow the procedure in below...
Check the volume level. If your team members can hear you but you cannot hear them or yourself, adjust your headset’s volume level using the Plus (+) and Minus (–) buttons on the left ear dome.
Check the microphone sensitivity setting. If you hear your voice cutting in and out, or your team reports hearing outside noise when you speak, adjusting the microphone’s sensitivity to sound should eliminate the problem.
Check the radio/intercom transmit setting. If neither you nor your team can hear your voice, check the headset’s radio/intercom transmit setting. The default mode is Radio VOX with hands-free intercom and push-to-talk for radio transmit. Return the headset to its default transmit mode by following the procedures in the User Manual to access the Advanced Menu and adjust the radio/intercom transmit setting.
1. Ensure the headset you are attempting to pair is one designed to pair to a Wireless Base Station (APX377, APX379). All other headset models (APX372, APX373, APX375) do not have the capability to perform wireless communication to a Wireless Base.
2. Ensure the headset powers on properly and has a sufficient battery charge.
3. If the headset is a model APX372, APX373, or APX375, the headset is operating as expected.
4. If headset is a model APX377 or APX379, attempt to perform a firmware upgrade on the headset.
5. After the firmware upgrade has successfully completed, attempt again to turn on the wireless headset and pair it to the Wireless Base Station.
6. If the pairing is successful, the problem is resolved.
If the problem continues, contact Service.
Sonetics wireless headsets enable natural conversation in challenging environments; no yelling required. DECT7® wireless technology offers more audio bandwidth, which means the headsets sound great. We combined our industry-leading audio quality with our exclusive auto-leveling, noise cancelling microphone so that you can understand the subtle differences in what you hear even in the middle of a loud work zone.
Sonetics wireless headsets connect to each other through a Base Station or ComHub using DECT7® wireless technology. DECT7 technology enables you to talk to team members without pushing buttons or waiting your turn. It’s like being on a conference call. Everyone hears each other whenever someone speaks. You can talk when you want to, interrupt when you need to, and warn when you have to. Learn more about DECT7 wireless technology.
You can pair a Bluetooth® wireless device to either of our APX375 or APX379 headsets enabled with Bluetooth wireless technology.
Up to 1,600 feet with an unbroken line of sight to the ComHub. Hang the ComHub in the middle of your work zone, and you’ve got a secure, portable communication ‘bubble’ that you can pick up and move wherever the work takes you. Your actual range may vary due to work site conditions. Learn how to maximize system range
Connect up to 20 team members on a portable system. Installed systems (in a vehicle or building) can connect even larger teams. Contact your Sonetics representative for more information on large systems.
To get started, you will need a Sonetics System, which includes wireless headsets, a ComHub or Base Station to connect them. For a portable system, we also have cases to store, charge, and protect your equipment. For more details, visit our Solutions page or contact us.
Sonetics has a one year warranty.
Sonetics Stereo Listen-Through Technology lets you mix in environmental sound so you can monitor equipment, hear warnings or keep an ear on traffic, all without removing your hearing protection or losing contact with your team.
Absolutely. The headband’s fit is adjustable and also reconfigurable into “under-helmet” wear that puts a soft strap over your head and rotates the hard headband behind your neck. It works for most hard hats and ball caps. We also offer hard hat adapters that mount each ear dome to a heavy-duty adjustable clip that fits the attachment points of most standard and specialty hard hats.
You can connect virtually any make/model of portable two-way radio. Find supported radios.
Sonetics wireless headsets are built to handle rugged working conditions like rain, snow, mud and dust. They’re IP66-rated, dustproof, water-resistant, and operate between -20°F and 140°F.
You can select from up to five channels available on the Base Station and switch between them with a button on the headset. The factory default is a single channel. To add more, switch your Base Station to Channel Mode by watching this quick video:
Yes, accessories like replacement batteries, ear seals, mic muffs (for wind noise reduction), ear dome ruggedizers (for updated headset colors), and more are available from the Sonetics Shop or your Authorized Sonetics Reseller.
A sound level meter is used to measure sound pressure levels in decibels (dB). The device is often tripod-mounted and used in a fixed location.
Measuring sound levels for the purpose of determining occupational noise exposure must take into account a “time-weighted average noise level of 85 dBA or higher over an 8-hour work shift.” Consult your safety manager or an environmental safety and health professional for assistance with compliance and noise exposure mitigation. Resources are available from OSHA and industry groups.
Three factors combine to determine whether you’re at risk for hearing damage from noise exposure: sound level, time and distance. Sounds above 85 decibels are risky and sounds above 125 decibels will cause immediate hearing damage. The risks increase with the amount of time you’re exposed to loud noise, and how close you are to the source of that noise. The louder it is, the longer you’re exposed and the closer you are to it, the more you’re at risk for hearing damage.
The Occupational Safety and Health Administration (OSHA) requires employers to take steps to reduce occupational noise exposure when an employee is exposed to a “time-weighted average noise level of 85 dBA or higher over an 8-hour work shift.”
The Environmental Protection Agency requires any hearing protector sold in the U.S. to have a noise reduction rating (NRR). NRR is a measure of a hearing protection device’s ability to reduce the wearer’s sound exposure. The higher the number, the greater the potential for noise reduction.
Sonetics headsets have a Noise Reduction Rating of 24 decibels (24dB NRR).
Sonetics wireless headsets connect to each other through a ComHub or Base Station using DECT7® wireless technology. DECT7 technology enables you to talk to team members without pushing buttons or waiting your turn. It’s like being on a conference call. Everyone hears each other whenever someone speaks. You can talk when you want to, interrupt when you need to, and warn when you have to. Learn more about DECT7 wireless technology.
Up to 1,600 feet with an unbroken line of sight to the ComHub. Hang the ComHub in the middle of your work zone, and you’ve got a secure, portable communication ‘bubble’ that you can pick up and move wherever the work takes you. Your actual range may vary due to work site conditions. Read more on how to maximize system range.
You will receive up to 24 hours of talk time after charging the headset for 4 hours.
Wireless headsets, a ComHub to connect them and a case to store and protect your equipment. For more details, visit our Team Solutions page.
Both the wireless headsets and the ComHub use Sonetics Lithium-Ion batteries that charge inside each device using the provided 12VDC wall adapters or by using the charging cables inside a Sonetics Charging Case.
Remove the Headsets, ComHub, and any accessories from the Pelican charging case. Plug the Headsets and ComHub into the charging cables inside the case. a. Follow the cut-outs to position the headsets within the case. b. Place the ComHub in its foam cutout. Secure the case lid. Insert the power supply’s barrel jack into the Charging plug on the side of the Pelican case. Hand-tighten the jack’s retention nut to prevent accidental removal. Plug the wall adapter into a standard 120v power outlet. Allow up to 4 hours to completely recharge all batteries.
A sticker on the inside of the right ear dome displays your headset’s model and serial number. To see it, remove the ear seal and inner foam cover from the right ear dome (the one without the microphone boom).
Sonetics wireless headsets enable natural conversation in challenging environments; no yelling required. DECT7® wireless technology offers more audio bandwidth, which means the headsets sound great. We combined our industry-leading audio quality with our exclusive auto-leveling, noise cancelling microphone so that you can understand the subtle differences in what you hear even in the middle of a loud work zone.
For a review of the headset’s button layout and basic operation, watch our Basic Features video.
Microphones on the forward edge of each ear dome can be turned on to allow the user to hear environmental sound. Use Sonetics Listen-Through technology when you need to remain aware of hazards, monitor equipment or speak to someone outside your team without the need to remove your headset.
The maximum sound level that Sonetics Listen-Through technology will let you hear is 95 decibels. If a sound should exceed that (a gunshot or explosion, for example), the headset will instantly shut down the ear dome speakers, protecting you from the sudden noise. You’ll hear a few moments of silence, followed by a gradual return to your previous settings.
When the Listen-Through feature is active, you may toggle between the OFF volume position and the last selected Listen-Through volume setting by briefly holding down the BACK and FWD arrow buttons, respectively.
You can pair a Bluetooth wireless device to either of our APX375 or APX379 headsets enabled with Bluetooth wireless technology.
The headset will respond to many button presses, menu selections and other status changes with voice prompts. For example, when you turn on the headset, you’ll hear “Sonetics on. Battery high. Base Station connected.”
For our complete illustrated fitment guide, refer to the User Manual. Here are a few key steps to remember when putting on your headset: 1. Inspect the ear seals (the pads that rest against your head) for damage before use. 2. While wearing, make sure that the ear seals rest against your skull without sitting on any part of your ear. 3. The microphone should be no more than 1/8″ from your mouth. 4. Adjust the headband or soft strap for a comfortable, gentle fit across the crown of your head. It’s normal to feel a bit of pressure when you wear the headset properly. The seal protects you from dangerous noise levels.
A status LED on the left ear dome will flash from 1 to 4 times when the headset is powered on. Four flashes indicates a full charge. A single flash means it’s time to recharge the headset.
Use the provided 12VDC regulated wall adapter or one of the headset charging cables in your Sonetics Charging Case. For details on vehicle charging, refer to the User Manual.
Absolutely. The headband’s fit is adjustable and also reconfigurable into “under-helmet” wear that puts a soft strap over your head and rotates the hard headband behind your neck. It works for most hard hats and ball caps. We also offer hard hat adapters that mount each ear dome to a heavy-duty adjustable clip that fits the attachment points of most standard and specialty hard hats.
You can connect virtually any make/model of portable two-way radio. Find supported radios and cables.
Sonetics wireless headsets are built to handle rugged working conditions like rain, snow, mud and dust. They’re IP66-rated, dustproof, water-resistant, and operate between -20°F and 140°F.
Sonetics headsets have a Noise Reduction Rating of 24 decibels (24dB NRR).
If you notice background noise coming through the microphone or you’re having trouble hearing yourself, it’s time to adjust the mic’s sensitivity setting for a better experience. Press the POWER button. Press the PLUS button on the left dome and the FWD button on the right ear dome at the same time, then let go. A voice prompt will announce the current mic setting. Adjust the mic sensitivity to any of the eight available settings by using the PLUS and MINUS buttons on the left dome. For a mix of high- and low-noise environments, the factory setting of Mic Auto 1 is recommended. After selecting a setting, exit the menu by pressing the PUSH-TO-TALK button on the right ear dome. Test out the setting with team members by putting the headsets on and talking into the microphone. Repeat steps 2-5 if adjustments are needed to find the best setting for your environment.
A walkthrough of the basic features on Sonetics’ third-generation wireless headsets. Includes volume control, listen-through, channels, power and other daily-use features. Right ear dome features The POWER button is located on the upper right. The FWD and BACK buttons control Listen-Through volume and DECT channel selection. The PUSH-TO-TALK button is located between the FWD and BACK buttons. The DC charge port is located beneath the PUSH-TO-TALK button. The battery access door is located on the back of the dome beneath the right ruggedizer. Front of headsets Stereo Listen-Through microphones are located on the front of each ear dome. The boom mic connects to the left ear dome (except APX372). The “TALK” label should face your mouth. Left ear dome features The PLUS and MINUS buttons control intercom volume, and Advanced Menu navigation and selection. The PUSH-TO-TALK button is located between the PLUS and MINUS buttons. The Status LED shows whether the headset is powered on, if you are connected to DECT and/or Bluetooth, and the current battery level (Low = 1 flash; High = 4 flashes). The portable radio wired connection access door is located on the back of the dome beneath the left ruggedizer. Mini USB port – Remove the left ear seal and inner foam to find a flap covering the mini USB port. The port allows a Windows PC connection to update and configure the headset
How to connect to your preferred power source and charge your Sonetics wireless headset. Plug the A/C or D/C charger into the charge port on the bottom of the right dome. The status LED will glow red while it is charging. Once the headset is fully charged, the status LED will glow green.
Listen-Through volume buttons are located on the right ear dome (without the mic boom). Press the FWD button to increase Listen-Through volume. Press the BACK button to decrease Listen-Through volume. Press and hold the BACK button to toggle Listen-Through volume off. Press and hold the FWD button to return to your most recent Listen-Through volume setting. Following each adjustment, a voice prompt will announce the new volume setting. There are five (5) Listen-Through volume settings.
Main Volume buttons are located on the left ear dome (with the mic boom). To increase volume, press the button on the left ear dome. To decrease volume, press the button on the left ear dome. To quickly increase volume to maximum, press and hold the button until you hear a voice prompt announce “volume maximum.” To quickly decrease volume to minimum, press and hold the button until you hear a voice prompt announce “volume minimum.” Following each adjustment, a voice prompt will announce the new volume setting. There are six (6) Main Volume settings.
Turn the headset off. Simultaneously press and hold the FWD and BACK buttons on the right ear dome (without the mic boom). Continue to hold during Step 3. Press and hold the Power button on the right ear dome. When you hear a voice prompt announce “Sonetics on. Battery (level). Advanced Menu,” release all three buttons. For instructions on making adjustments to Advanced Menu settings, click here.
To first access the Advanced Menu, follow these instructions. Press the Menu button on the left ear dome to cycle through different settings. a. To adjust an individual setting, cycle through the options using the and buttons. b. To select a different Advanced Menu setting, continue pressing the Menu button. To Save and Exit the Advanced Menu, press the Push-to-Talk button on the right ear dome.
To create a new Bluetooth pairing: 1. Turn off the headset, then turn it back on. 2. The headset will enter Bluetooth pairing mode for 10 minutes after power on. 3. From your device’s Bluetooth connectivity options, search for new devices. 4. Once the search is complete, select “Sonetics-HS##.” If prompted for a password, enter four zeros (0000).
To answer a Bluetooth call, press and release the Menu button. To end a Bluetooth call, press and release the Menu button.
How to quickly modify your Sonetics wireless headset to accept a direct-wire portable radio or other direct-wire device. When connecting your direct wire radio or device to your Sonetics APX 3-Series Headsets, you will need the following: Portable Radio Portable Radio Adapter Cable Sonetics Screwdriver Scissors Instructions: Place the handle of the Sonetics Screwdriver between the rigid headband and left ear dome. Use your other hand to press down on the headband until it pops off the dome. Peel back the ruggedizer, slide it off the boom mic, and set the headset aside. On the inside of the ruggedizer is a molded outline for the direct wire door. Fold the ruggedizer so the outline is folded in half and the lines match up with each other. Snip along the folded lines with the tip of the scissors to make an access point with the scissors. Unfold the ruggedizer and starting at the snipped section, cut along the molded outline until the section can be removed and discarded. Put the ruggedizer back on the dome by placing the lower hole through the boom mic and sliding the ruggedizer into place on the dome. Check that the new cutout on the backside is over the direct wire door. Align the headband to the center of the dome and snap in place. Take the Sonetics screwdriver to pry the direct wire door open. Take the adapter cable and plug it inside the wire door opening and use the screwdriver to tighten the screw and secure the plug in place. Secure tightly to keep the connector waterproof. Connect the other end of the adapter into the radio. Refer to your manual or check with your dealer as you may need to make some programming adjustments to your radio. Set the volume on your radio, then set your radio transmit, and you’re ready to go!
Expand the headband to full width. Place the ear domes over your ears, the headband over the crown of your head, and position the microphone boom over your left cheek. Position the microphone no more than 1/8 inch from your lips. The “TALK” label should face your mouth. Ensure the padded ear seals completely cover your ears with all parts of the ear seals resting against your skull, not your ears. Adjust the hard headband to sit gently on top of your head. Test the ear seals by pressing against your head and listening for a change in sound level.
Expand the hard headband to full width. Place the ear domes over your ears, the Velcro head strap over the crown of your head, the hard headband behind your neck, and the microphone boom over your left cheek. Position the microphone no more than 1/8 inch from your lips. The “TALK” label should face your mouth. Ensure the padded ear seals completely cover your ears with all parts of the ear seals resting against your skull, not your ears. Adjust the Velcro head strap to sit gently on top of your head: a. Pull the tabs to release the Velcro. b. Adjust the length of the head strap for comfort. c. Press the tabs to seal the Velcro. Adjust the hard headband to fit comfortably behind your neck. Test the ear seals by pressing against your head and listening for a change in sound level.
Update firmware and configure settings on your Sonetics wireless headsets. This includes enabling, adjusting and disabling features like listen-through awareness and microphone sensitivity. Update Firmware Locate the USB-to-Mini USB cable included with your headset. Take off the inner ear seal from the left dome of the Sonetics headset. Remove the foam cover from the inside of the dome. Lift up the rubber door inside the dome to access the mini USB connector. Plug in your USB. Turn on your device. Headsets: Hold down POWER button near the top of the right ear dome for half a second. Base stations: Will turn on automatically once you plug in the USB. Click on the “Find Device” button in the bottom left of the Sonetics Configuration Utility software menu. Proceed with any Firmware updates, if available, by selecting the yellow “Update Firmware” button and following the prompts. Note: If your Firmware is out of date, there will be a red box next to the Application field. The update is complete once the green bar is full and the Programming Status shows “You may remove device”. Note: The red box in the Application field should be gone. Select the “Customize Device” button on the left side of the Configuration Utility menu. Refer to your manual regarding the features listed and select your preferred settings. Once you have selected your preferences, click on the yellow “Write Menus” button to save the selections. Saving Cloned Settings to A New Device To clone the settings to save for other devices, go to the “File” dropdown and select “Save Menu File As” and save the file to your computer. When you plug in another headset, you can go to the “File” dropdown and select “Load Menu File” and find the cloned settings file that you saved to your computer. Click on the yellow “Write Menus” button to write the cloned settings to the new device. Return to Factory Settings Open up the Sonetics Configuration Utility software. Select the “Customize Device” button on the left side of the Configuration Utility menu. Click on the “Menu Defaults” button on the right side of the window. Click on the yellow “Write Menus” button to save the selections. Viewing Settings on a Device Open up the Sonetics Configuration Utility software. Select the “Customize Device” button on the left side of the Configuration Utility menu. Click on the blue “Read Menus” button and the settings will display below. For additional help, go to the “Help” tab. The Software Manual can be downloaded there or the Product Manual for the specific device that is connected.
Just a few quick steps let you easily reconfigure the headband on a Sonetics wireless headset from behind-the-head (or hard-hat compatible) to over-the-head wear. To reconfigure the headband from behind-the-head to over-the-head wear, begin by removing the Velcro head strap from the ear domes. Set aside. Place the handle of the Sonetics Screwdriver between the rigid headband and ear dome. Use your other hand to press down on the headband until it pops off the dome. Repeat Step 2 to detach the headband from the other dome. Move the headband 90 degrees forward and press it firmly back into the ear dome. Repeat Step 4 to reattach the headband to the other ear dome. To reconfigure from over-the-head to behind-the-head wear, reverse Steps 1-5.
Here’s how to pair Sonetics wireless headsets with a Comhub or base station. Power on the Base Station and connect the DC power adapter. Wait until the green power light is illuminated. Hold down the pairing button on the base station for the position you want to pair. The yellow LED will start flashing slowly. On the Wireless Headset, hold down the right PUSH-TO-TALK and POWER buttons. A voice prompt announces “Base Station registering”, and the status LED on the left ear dome will flash green and red. Release both buttons. Check the Base Station to confirm the headset is successfully paired. The yellow LED pairing light on the base station will stop flashing and remain yellow indicating that the headset is paired.
Follow these steps to remove and replace the headband and ruggedizers on a Sonetics Wireless Headset. The headset color can be changed to help identify individual users or team roles. Visit the Sonetics Store for new headset colors (ruggedizers) and other replacement parts. What You Will Need Replacement Sonetics headband Pair of silicone ruggedizers Sonetics screwdriver Steps REMOVE the soft head strap by unhooking the Velcro tabs on each end and pulling the strap out of the slots on top of the ear domes. Set the strap aside. Note: You can SKIP THIS STEP if your headset is in over-the-head configuration. POSITION the handle of the Sonetics Screwdriver between the plastic headband and ear dome. While holding the screwdriver in place, use your other hand to press down on the headband until it pops off the dome. REPEAT Step 2 on the other side of the headband. Note: There is a RIDGE on the underside of the headband that will help align the Sonetics Screwdriver Remove the CROSSOVER CABLE from the headband. PULL GENTLY in the direction that each clip opens to release the cable and SET ASIDE the old headband. Note: There are 4 CLIPS holding the cable in place. The two outside clips open toward the top of the headband, while the two inside clips open downward. REMOVE THE RUGGEDIZERS by peeling them off the ear domes.SLIDE the left ruggedizer down the mic boom and off, and set both ruggedizers aside. IDENTIFY the Left Ruggedizer of your replacement pair, which has an extra opening for the mic boom.INSTALL the Left Ruggedizer by INSERTING the mic boom through the lower opening. SLIDE the ruggedizer back up over the mic boom. FIT the ruggedizer onto the ear dome and check the fit over the Listen-Through microphone. INSPECT for gaps and curling around the ear seal. REPLACE the Right Ruggedizer by fitting onto the ear dome.CHECK the fit over the Listen-Through mic and power adapter and INSPECT for gaps and curling around the ear seal. REINSTALL the plastic headband with the crossover cable clips pointed down.LAY the right ear dome down flat, while holding the LEFT EAR DOME in your left hand. LINE UP the cross on the headband with the socket on the ear dome and push together firmly to reconnect. Repeat for the right ear dome. REINSTALL the crossover cable underneath the black plastic headband by gently PRYING UP each clip to fit the cable underneath. ROUTE the cable underneath all four clips on the headband. REINSTALL the Velcro soft strap by SLIDING the strap through the slot on top of each ear dome. FOLD the ends over and press to secure the Velcro. Note: SKIP THIS STEP if your headset is in over-the-head configuration.
Press and release the Power button on the right ear dome (without the mic boom). A voice prompt will announce “Sonetics off.” The LED on the left ear dome will turn off.
Press and release the Power button on the right ear dome (without the mic boom). A voice prompt will announce “Sonetics on. Battery (level).” The LED on the left ear dome will begin flashing.
It’s the component in a Sonetics Wireless Communication System that connects wireless headsets together. The SON150 Base Station can connect up to five wireless headsets.
The ComHub stores the wireless base station in a portable, battery-operated, weatherproof case. As such, you can pick up the ComHub and carry it around the work zone with you. You also use the ComHub to connect a two-way radio.
You can expect up to 24 hours of battery life from the SCH305 ComHub, and up to 12 hours from the SCH310 and SCH310T ComHubs.
A status LED next to the power button flashes from 1 to 4 times when the ComHub is powered on. Four flashes indicates a full charge. A single flash means it’s time to charge the ComHub.
Use the provided 12VDC regulated wall adapter or the ComHub charging cable in your Sonetics Charging Case.
Make sure you position the ComHub upright (there are stickers on the case to help you orient it). Raise it up off the ground as much as is safe, and try to have as few obstacles between the ComHub and the headsets as possible (clear line of sight).
You can connect virtually any make/model of portable two-way radio.
Watch this quick video on how to connect a portable two-way radio to the ComHub, or review the full instructions in your ComHub user manual.
You can select up to five channels available on the Base Station and switch between them with a button on the headset. The factory default is a single channel.
For tethering to work with a SCH305-BT, the ComHub needs to be set up into Channel Mode: Set up for 2 Channels. This is not needed when you are only using the SCH305 ComHub version. Reason for this, is the addition of the Bluetooth module in the SCH305-BT. You can tether with the SCH305-BT ComHub, but you cannot access the device which is Bluetooth paired to the SCH305-BT from the same channel as the tethered group. The tethered group will be on Channel 2 and the Bluetooth paired device is on Channel 1.
Yes. Broadcast mode functions the same way as with the SCH305 ComHub.
Yes. Channel Mode is supported on the SCH305-BT.
Currently, the SCH305-BT does not support two-way radio transmit and receive functions.
A few things you can try are the following: 1. Turn off all Bluetooth enabled devices around you. 2. Power cycle the SCH305-BT. 3. If you have multiple SCH305-BT ComHub's, make sure you have one powered ON at a time. Your device needs to be a cell phone, tablet, or laptop. If you are trying to pair a different device it may not pair to the SCH305-BT.
Here's how to pair Sonetics wireless headsets with a Sonetics Comhub / Base Station . Power on the Base Station and connect the DC power adapter. Wait until the green power light is illuminated. Hold down the pairing button on the base station for the position you want to pair. The yellow LED will start flashing slowly. On the Wireless Headset, hold down the right PUSH-TO-TALK [icon-button-ptt-right] and POWER [icon-button-power] buttons. A voice prompt announces “Base Station registering”, and the status LED on the left ear dome will flash green and red. Release both buttons. Check the Base Station to confirm the headset is successfully paired. The yellow LED pairing light on the base station will stop flashing and remain yellow, indicating that the headset is paired. TIP: If you’re using a Comhub, open the ComHub red bag, remove the black case and open its lid to access the Base Station before beginning the pairing procedure.
Unsnap the cover of the red bag and remove the ComHub. Take your PR cable and connect to the Intercom Port on the Control Panel. Use the Sonetics screwdriver to tighten the screw. Take your ComHub and slide it back in the bag with the PR cable coming out the top. Snap the cover of the bag in place. Connect the far end of the PR cable to your portable radio. Short video demonstrating how to connect a portable two-way radio to the ComHub using a Portable Radio Adapter.
Here’s how to clear a wireless headset pairing on your Sonetics SON150 DECT7 Wireless Base Station. Hold down the pairing button that is in quick flash mode, and the LED light will change to slow flash mode. Disconnect the power cord from the base station. Reconnect the power cord, and the green POWER LED light will illuminate, but LED light above the pairing button should not be lit up anymore. This indicates that the pairing is cleared.
Here’s how to clear a wireless headset pairing on your Sonetics DECT7 Wireless ComHub. Access the ComHub’s Base Station: a. Remove the gray Pelican case from the red nylon bag. b. Open the latches and lift the case lid. Turn on the ComHub by pressing the Power button on the control panel. Hold down the pairing button that is in quick flash mode and the LED light will change to slow flash mode. Press the Power button on the Base Station control panel to turn off the ComHub. Press Power to turn on the ComHub. The green POWER LED light will illuminate, but the LED light above the pairing button will turn off.This indicates that the pairing is cleared.
Here’s a quick look at how to configure your Sonetics DECT7 Wireless Base Station for each of its three operating modes. Digital Intercom Connection: Disconnect the base station from the power supply. Hold down pairing buttons 1 and 2 while connecting the power supply. Wait until only the yellow LED lights above pairing buttons 1 and 2 light up as well as the green POWER LED light. The green LED lights on the ports 1 and 2 will also light up. Unplug the base station and plug it back in. Legacy Analog Intercom: Disconnect the base station from the power supply. Hold down pairing buttons 2 and 3 while connecting the power supply. Wait until only the yellow LED lights above pairing buttons 2 and 3 light up as well as the green POWER LED light. The green LED lights on the ports 2 and 3 will also light up. Unplug the base station and plug it back in. Base Station Portable ComHub Connection: Disconnect the base station from the power supply. Hold down the pairing button 3 while connecting the power supply. Wait until only the yellow LED light above the pairing button 5 lights up as well as the green POWER LED light. Select the pairing button that matches the number of channels you need. The yellow LED light will come on above it. Unplug the base station and plug it back in. Repeat steps 1 – 4 to when needing to readjust the number of channels.
Most teams that communicate with Sonetics wireless headsets rarely need the system’s full range. When team members are within a few hundred feet of a ComHub on a Vactor or tow truck, crane, construction job site or factory floor, DECT7 connectivity is strong and dependable. But some teams need every inch of the 1,600-foot range that DECT7 provides from a ComHub. Road construction crews, agricultural workers and marine operations often include team members who need to work at the edge of DECT7’s range, where they can still take advantage of interference-free, secure communication that’s as clear and seamless as a landline conference call. Remember these three phrases when you want to extend the range of your Sonetics wireless team communication system: Line-of-sight Height Orientation Essential Components of Maximum Range No card tricks here. Antennas define the coverage area of DECT7 wireless. Our dual-dome antenna design in the headsets uses diversity switching to lock in the best of the two signals. In other words, users don’t need to worry about head position relative to the ComHub. No matter which way you turn, DECT7 delivers the best possible connection at all times. Speaking of the ComHub, it’s the central nervous system of your work site’s wireless communication setup. As long as you have a charged ComHub and headsets, you have a secure, local communication network no matter how remote your jobsite. There are no external antennas that break, snag or need to be replaced. Everything is contained in a weatherproof portable case. Official specifications for the range of DECT7 wireless from a ComHub is 1,600 feet line of sight. Where you position your ComHub factors greatly into achieving that maximum range. Outta Sight, Outta Touch? The first guiding principle to help you maximize range, “line-of-sight,” doesn’t necessarily mean that you have to be able to see the ComHub from just over five football fields away. This is not an eye test. But as long as there are no barriers between you and the ComHub, you can expect uninterrupted communication at up to 1,600 feet. Barriers can reduce the system’s range as your signal uses some of its power to climb over and around structures and equipment. So if the ComHub is blocked from your line of sight by a lot of big, heavy equipment, walls or mountains, then you will have to use trial and error to determine the best placement. To help you position the ComHub, the headsets include an out-of-range voice prompt if the connection weakens and is about to be lost. Range testing the Sonetics ComHub. The Height of Elevation Getting the ComHub off the ground is actually an extension of the line-of-sight guiding principle. You’ll have a better chance of seeing the ComHub from five football fields away if you raise it up in the air. Usually, the range will be greater if the ComHub is four to 16 feet off of the ground. This is also the best way to avoid ground-level obstructions such as automobiles, boulders, or small trees. The ComHub is housed in a sturdy, weatherproof nylon bag with a coated hook attachment, so it’s easy to securely hang off of a ladder or aerial lift. Stand Up for Orientation Orientation matters: Vertical and horizontal orientations deliver the most consistent results. How you orient the ComHub also matters. Of the three standard options for orientation—vertical, horizontal or flat—vertical and horizontal both help you maximize the system’s range. Beyond 1,600 feet For all team members to take advantage of full-duplex or broadcast connections in crystal-clear DECT7, they need to be within range of the ComHub. It is possible in some circumstances to extend range beyond 1,600 feet (for example, we got 4,400 feet of range using the idealized setup shown in the photo above). However, you should have backup communications at the ready if you know you’ll be operating at the edge of DECT7 range. Beyond DECT7 range, the entire world is within reach. You can direct-wire a connection to a two-way radio if you want to extend the range to a few miles. Note that you’ll be subject to the two-way limitations of PTT and half-duplex communication. Bluetooth-enabled systems also allow you to wirelessly connect to your cell phone with your headset, giving you global communication options.
Press and briefly hold (1-2 sec.) the Power button on the ComHub’s control panel. The green Status LED next to the Power button will illuminate and then begin flashing to indicate battery level.
Press the Power button on the ComHub’s control panel. The green Status LED next to the Power button will turn off.
Connect the included 12VDC wall adapter’s barrel jack to the Charger Port on the ComHub’s control panel. Plug the wall adapter into a standard 120V wall outlet. The Charge LED in the center of the Power button will light solid red. Allow up to 4 hours to completely recharge a depleted battery.
Ensure you have purchased the correct Portable Radio (PR) Cable for your radio’s make and model. See the Radio Interface Guide for details. Connect the PR cable’s ComHub plug to the Intercom port on the ComHub control panel using the included Sonetics Screwdriver or a flathead screwdriver. Connect the portable radio plug to your radio.
Access the ComHub’s Base Station: a. Remove the gray Pelican case from the red nylon bag. b. Open the latches and lift the case lid. Turn on the ComHub by pressing the Power button on the control panel. Press and hold the desired pairing button until its yellow LED link indicator begins to flash slowly. With the Headset powered off, place the APX377 or APX379 Wireless Headset into pairing mode by pressing the Push-to-Talk button and Power button simultaneously until a voice prompt announces “Sonetics on. Battery (level). Base Station registering.” Immediately release both buttons. The Base Station will automatically connect, showing a solid yellow link LED. A Headset voice prompt will announce “Base Station connected.” If pairing was unsuccessful, repeat Steps 3-5.
Using the included 12VDC Wall Adapter, connect the barrel jack to the power port on the SON150. Connect the adapter to a standard 120V wall outlet. Press and hold the desired pairing button until its link indicator begins to flash slowly. Any previous pairing will be cleared. With the Headset powered off, place the APX377 or APX379 Wireless Headset into pairing mode by pressing the Push-to-Talk button and Power button simultaneously until a voice prompt announces “Sonetics on. Battery (level). Base Station registering.” The SON150 will automatically connect, showing a solid pairing button LED. If the pairing was unsuccessful, repeat Steps 1-2.
Installing the Sonetics Configuration Utility software for Windows version 7 and later. Complete and submit the Firmware Request form. You will receive an email from service@sonetics.com with a link to download the latest version of the Sonetics Configuration Utility software. Once your download is complete, open the ZIP file and double click on the “setup.exe” file. Go through the wizard and install on the C:\ drive and also install the drivers. If user account notifications pop up, they are safe to proceed. Select “Install Drivers” in the USB Management Tool then close the window and the installation window. Open the Sonetics shortcut on the desktop to access the Sonetics Configuration Utility software.
Update firmware and configure settings on your Sonetics DECT7 wireless base station. Enable and disable operating modes. Updating the Base Station: Follow the steps in the Installing the Sonetics Configuration Utility tutorial. Open the Sonetics Configuration Utility. Plug in the mini USB cable to the base station. The green POWER light should illuminate. Click on the “Find Device” button in the bottom left of the Sonetics Configuration Utility software menu. Proceed with any Firmware updates, if available, by selecting the yellow “Update Firmware” button and following the prompts. Note: If your Firmware is out of date, there will be a red box next to the Application field. Select the “Customize Device” button on the left side of the Configuration Utility menu. A pop up will direct you to enter Boot Mode on the base station. Unplug your USB, hold down the pairing button 5 and plug the USB cable back in. The green POWER light will start flashing. The update is complete once the green bar is full and the Programming Status shows “You may remove device”. Note: The red box in the Application field should be gone. Configuring the Base Station: With the device still connected, select the “Customize Device” button on the left side of the Configuration Utility menu. Refer to your manual regarding the settings and how to adjust the number of channels. Once you have selected your preferences, click on the yellow “Write Menus” button to save the selections. The selections have been updated once the green status bar is full. Exit the Configuration Utility.
Using the included 12VDC Wall Adapter, connect the barrel jack to the power port on the SON150. Connect the wall adapter to a standard 120V outlet. For vehicle power, use the 12V Cigarette Lighter Adapter. Connect the barrel jack to the power port on the SON150. Connect the adapter’s power plug to a 12V vehicle adapter.
Devices you can pair include: cell phones, tablets, and laptops. With the lid of the SCH305-BT open and the SCH305-BT powered ON, you will see a LED light in the lower RIGHT corner of the ComHub which will blink RED and BLUE quickly. This indicates Bluetooth mode is ON. With your user device (cell phone, tablet, or laptop) ON, look for: “SCH305-BT” (this is the SCH305-BT device name). Select the “SCH305-BT” to start pairing. The BLUE LED light in the lower RIGHT corner will blink BLUE when devices are successfully paired. Bluetooth Pairing Tips: If pairing is unsuccessful, repeat the steps again. If your ComHub has been on for a while and pairing is not successful, simply power cycle your SCH305-BT. When using FaceTime, you must also change the speaker output to “SCH305-BT” on the user device paired to the SCH305-BT. If multiple SCH305-BT ComHubs are close to each other, we recommend having one SCH305-BT ComHub powered ON at a time when doing the Bluetooth pairing. Once the first Bluetooth pairing is complete on the first SCH305-BT, then power ON the next SCH305-BT to pair a Bluetooth device to the second ComHub. NOTE: Bluetooth in portable two-way radios is not currently supported.
See the “DECT Channel Mode Operation” section to put your SCH305-BT into Channel Mode. Follow the “Configuring for Channel Selection” steps. When you are selecting the “Number of Available Channels”, select the “2” pairing button, to select 2 channel mode. To exit this configuration mode, power off the SCH305-BT, then power it on. Bluetooth Pairing Tips: If pairing is unsuccessful, repeat the steps again. If your ComHub has been on for a while and pairing is not successful, simply power cycle your SCH305-BT. When using FaceTime, you must also change the speaker output to “SCH305-BT” on the user device paired to the SCH305-BT. If multiple SCH305-BT ComHubs are close to each other, we recommend having one SCH305-BT ComHub powered ON at a time when doing the Bluetooth pairing. Once the first Bluetooth pairing is complete on the first SCH305-BT, then power ON the next SCH305-BT to pair a Bluetooth device to the second ComHub. NOTE: Bluetooth in portable two-way radios is not currently supported.
Hold down the Power button for 15 seconds, then release. This will restart Apex Connect.
Corded headsets using a 4 conductor 3.5mm jack (CTIA/AHJ or OMTP). Bluetooth Devices supporting Hands-free.
With Bluetooth you can pair headsets, wireless ear buds, headphones, speakers and/or speaker phones. (Hands-free Profile Format Required)
Yes. Apex Connect is watertight and dust proof and IP67 rated.
No. Apex Connect is designed around Bring Your Own Headset. This allows users to interact the way they want.
Yes. Apex Connect can be paired with all Sonetics Wireless Base Stations, and comhubs.
Power on the Base Station/Comhub and connect the DC power adapter.Wait until the green power light is illuminated. Hold down the pairing button on the base station for the position you want to pair.The yellow LED will start flashing slowly. On the Apex Connect, power it ON by pressing and holding the Power button 2 seconds, then release.The Power LED will come on and the DECT LED will blink Green. On the Apex Connect, hold down the Power AND PTT buttons simultaneously for 2 seconds, then release.The DECT LED will change to a slower blinking Green. The DECT LED will turn Solid Green on the Apex Connect when DECT pairing is complete.The yellow LED pairing light on the base station will stop flashing and remain yellow.
Turn ON your Bluetooth headset, earbuds, or speaker. On the Apex Connect, power it On by pressing and holding the Power button 2 seconds, then release.The Power LED will come on. Follow your Bluetooth headset, earbuds, or speaker’s instructions to put your device into pairing mode. Put Apex Connect into Bluetooth pairing mode by simultaneously pressing the PTT and + buttons and holding for 2 seconds, then release. The Bluetooth LED on the Apex Connect will be blinking Blue. Bluetooth pairing is successful when the Bluetooth LED is solid blue on Apex Connect.
On the side of Apex Connect, use the + and – buttons to increase or decrease the volume. You will hear an audible voice prompt stating the volume level.
With Apex Connect powered ON, press the – button for 2 seconds and release. To turn OFF the Mute feature press the PTT button or press the – button for 2 seconds and release. The Mic LED will turn off.
Apply a 1 second short Power Button press. The Power LED will turn Green or Red (depending on battery level).
Apply a 1-second short Power Button press. The LED indicators will turn off.
1. Press and briefly hold the power button on the right ear dome. 2. The status LED on the left ear dome should begin flashing. 3. If the Status LED does not flash, connect the headset to the power adapter and allow it to charge. Allow the headset battery to charge for a minimum of 4 hours to allow for up to 24 hours of operational use. If the headset will not turn on after performing Steps 1-3, contact Support
Is the ComHub or Base Station powered on? Check the ComHub’s status LED (to the right of the power button). It should be flashing green. If not, press the power button. If you’re using a stand-alone wireless Base Station, connect it to your power source using the supplied 12VDC adapter. The Base Station’s power LED will show a steady green. Is the headset powered on? Check the headset’s status LED on the left ear dome. If there is no light, press and briefly hold the power button on the right ear dome. The status LED should begin flashing red, and you’ll hear a voice prompt announce “Sonetics on.” Is the headset paired to its base station? As the headset turns on, a voice prompt will announce “Sonetics on. Battery (high/medium/low).” If you turned on your ComHub prior, the headset will announce “Base station connected” when pairing is complete. If you don’t hear that prompt, check the headset’s status LED. It will flash green if it’s paired to your ComHub or base station. If it’s flashing red, it’s powered on but not paired. Follow the procedure in below... Check the volume level. If your team members can hear you but you cannot hear them or yourself, adjust your headset’s volume level using the Plus (+) and Minus (–) buttons on the left ear dome. Check the microphone sensitivity setting. If you hear your voice cutting in and out, or your team reports hearing outside noise when you speak, adjusting the microphone’s sensitivity to sound should eliminate the problem. Check the radio/intercom transmit setting. If neither you nor your team can hear your voice, check the headset’s radio/intercom transmit setting. The default mode is Radio VOX with hands-free intercom and push-to-talk for radio transmit. Return the headset to its default transmit mode by following the procedures in the User Manual to access the Advanced Menu and adjust the radio/intercom transmit setting.
1. Ensure the headset you are attempting to pair is one designed to pair to a Wireless Base Station (APX377, APX379). All other headset models (APX372, APX373, APX375) do not have the capability to perform wireless communication to a Wireless Base. 2. Ensure the headset powers on properly and has a sufficient battery charge. 3. If the headset is a model APX372, APX373, or APX375, the headset is operating as expected. 4. If headset is a model APX377 or APX379, attempt to perform a firmware upgrade on the headset. 5. After the firmware upgrade has successfully completed, attempt again to turn on the wireless headset and pair it to the Wireless Base Station. 6. If the pairing is successful, the problem is resolved. If the problem continues, contact Service.
Support
Monday – Friday
6:30 am – 5:00 pm PST
800-833-4558
Fax 503-620-2943